
There is a common joke among modelers, that whenever a highly-coveted prototype isnĺt made in model form by any of the reasonably-priced manufacturers, all you need to do is scratchbuild one ľ and, lo-and-behold! A month or two later an announcement for that very item appears in Model Railroader. Maybe now Herpa or Con-Cor will start producing pneumatic dry-bulk semi trailers that all of us can afford..? At the very least Iĺm hoping to maybe inspire a few other modelers to try this.
All I knew was that my layoutĺs cement distribution facility didnĺt look complete without a few of these over-the-road bulk rigs parked on the property. I didnĺt have the extra cash to pay $400 apiece for the brass units sold by Classic Mint Collectibles. So I rounded up all the tools and raw materials I had lying around, and commenced to build my own.
[ Note: Since I only purchased roughly half of what I used in this project, I canĺt show a complete bill-of-materials ľ sorry about that! ]
The Tank Body
Using side-view photos of prototype bulk trailers ľ which I cannot show here because they are not my own - I developed a rough profile of a dry-bulk tank body. I figured I could model the ends by hanging rings of decreasing diameters along a spine. I estimated the tank width by measuring the horizontal diameter of a Herpa gasoline tanker semi-trailer. The diagrams below illustrate the general concept:
Next, I gathered whatever leftover pieces of Plastruct ABS tubing I could find in my various scrap boxes. I was going to need nine (9) different outside-diameter sizes of at least a linear foot each, from 1/8 of an inch and progressing upward in 0.125-inch increments to 1.125 inches. Naturally I didn't have every single one of the required sizes, so I needed to order 3 of them from Plastruct. To make precision diagonal cuts into the main tank body, I would need to use a Jorgensen hand-powered miter saw instead of my large electric one. Since it only allows adjusting angels along the horizontal axis, I needed to make a special jig to anchor the 1.125" tube.

I also bolted the Jorgensen bracket to my workbench for added stability. With the angled jig clamped into position, I made four 45* angle cuts that went almost - but not quite - to the center of the tube.


For each of the tank's ends, I cut eight 1/8-inch thick 'slices' of each size of ABS tubing except the 1/8-inch [which was going to serve as the spine].

I hung these on the spine, pushed them tightly against each other, and applied Plasticweld to cement them together.


When the glue dried, I carefully wrapped 'invisible' scotch tape around the outside of each eccentric cone, ensuring that there were no kinks or wrinkles in the tape. Then I mixed up ~ 2 ounces of J-B Weld steel epoxy and injected this wherever I could squeeze it into the cone frame. I used the slow-setting (24hr) type of glue because I wanted to allow plenty of time to allow gravity to pull it into every open space.


When it cured, the top gaps still needed to be covered.

This time I used J-B Quik, which sets in 4 minutes rather than 8 hours. After ~30 minutes I was able to start grinding it into shape.


The excess length of the spine stick needed to be cut off, at an angle perpendicular (90*) to the top surface. This required another specialized jig, to keep the piece from being rolled during the cutting process.


Finally, the bottom had to be carved out to make room for the adjoining funnel. I used a Dremel with a grinding bit to do this:

For the funnel bottoms, I needed three 90*-angle Plastruct cones on each trailer. These were only available on sheets of five and had to be ordered directly from Plastruct, since my local hobby shop only carried their smaller items. Two sheets provided the number of cones I needed.

I cut each cone into rectangles ~1 inch long and slightly less than an inch wide:

Each of the end funnel cones had to be trimmed even further in order to fit properly into the tank body. After I did this, I had all the primary pieces for the tank body.

First I laid in the center funnel. The ends had to line up exactly with the centers of the 'V' cuts.

The end cones were trimmed so that slightly less than half of their diameters would protrude from the ends of the tank body.


With the funnel cones in proper position, I cemented the end pieces on:

A lot of gaps remained on the underside, so I filled these in with J-B Quik and filed everything into what seemed like the right shapes.

The Frame
Next, I began work on the frame. For the bottom supports, I cut two 7-inch lengths of Evergreen .080"x.125" strip styrene. Using an old bluebox Athearn piggyback trailer chassis as a reference, I cemented them parallel to each other roughly 3/8" apart. Then I laid them atop the upside-down tank body and marked the exact locations of the funnel cones. I mounted my Dremel on a drill press attachment and carefully ground-out the cavities where the funnels would rest. The drawing below shows the approximate cutting angles.


With the funnel cavities ground out, I fit the frame to the tank body, made sure everything was centered - and cemented just one funnel to the frame. I did this in case I ended up having to detach the frame later, so I would only have to separate two joints (not six).

I used some more .080"x.125" strip styrene to make the angled end supports.


I used a clamp to hold the tank/frame assembly at an angle, so the end supports could be attached.

For the end braces, I cut four pieces of .040"x.080" strip styrene.

With the angled end frame pieces on, I was ready to trim off the forward end. I used a pair of Xuron rail nippers to get a flush cut.

From now on I would need a jig to support the entire assembly, with the forward and rear frame ends at different levels. This enabled me to position the clipped-off forward end at a higher level and cement it on. Combinations of varying thicknesses of strip styrene, stacked atop a base of .080"x.250", elevated the body at exactly where it would be with the wheels attached to the rear and a tractor under the front.


At this point I cemented the forward end braces and the rear axle slots.

In order to effectively model the wheel covers, I needed to use K&S strip brass cut to the needed lengths and gently bent at the ends. The following three photos show how I attached the rear wheels and wheel covers:


I needed to position the assembly upside-down in order to attach the piece of sheet styrene that would support the forward (tractor) wheel covers:


The Discharge Pipe and Other Details
At this point, I needed to focus on the underside details: The funnel bottoms and the discharge pipe. I wanted to be able to bend and curve the pipe as it appears on the prototype, so I used three 6-inch long pieces of 20 AWG solid [not stranded] wire. I chose this since, with the insulation, the thickness measured almost exactly 1/16th of an inch.

I had pre-drilled 1/8th-inch holes in the bottoms of each of the funnel cones before gluing them to the tank body, so now I grabbed three scraps of 1/8th-inch diameter Plastruct tubing that would fit into those holes. I also needed to drill 1/16th-inch diameter holes at the visible ends for the discharge pipe to fit through.


Now I needed another set of jigs to hold the funnel bottom pipes in the exact positions needed for cementing:


With the funnel bottom pipes now firmly attached, I was able to bend the wire into the necessary shape and trim off the ends.


For the rear bumper, I used two pieces of sheet styrene, a 11/8-inch length of .040"x.080" strip styrene, and ~1/2-inch of .040"x.040" for the bumperĺs lower "lip":


I still needed top loading hatch covers; I sliced off 3 pieces of 1/4-inch Plastruct tubing for this purpose.

A few strips of .040"x.040" styrene served as the anti-slip guards. (Yes I know, brass wire would have looked much better ľ but as I mentioned earlier, these models are not intended to be viewed up close.)


I filled in the doughnut-holes of the hatch covers with J-B Quik:

My local hobby shop had a bag of four Athearn caboose ladders available. These were too short to be used on the side [as roughly half of these trailers are built], but with a little creative bending and adding an extra rung at the top, they worked quite nicely as end ladders. For the hose storage tubes, I used Evergreen 3/32nd-inch tubing.

After determining the optimum position for the ladder, I drilled holes for it where needed. This would allow me to avoid gluing it permanently, so I could remove it when spray painting.

This is what it looked like with details added, before painting:

What a difference a coat of primer makes! These before-and-after shots prove how necessary it is for eliminating the contrast between the plastic and the epoxy.


Finally, a coat of light gray finished it for now, at least; Iĺll add weathering later.


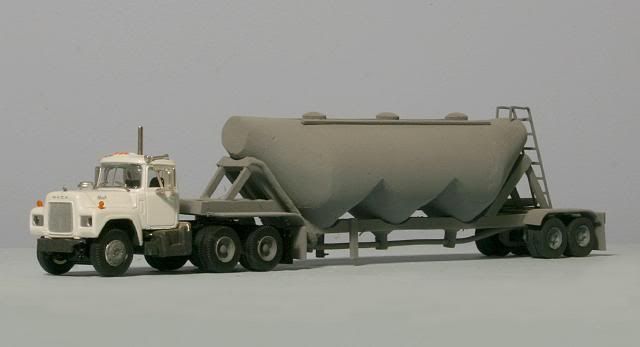
Hereĺs how it looked with an Athearn Mack Model ĹRĺ tractor:
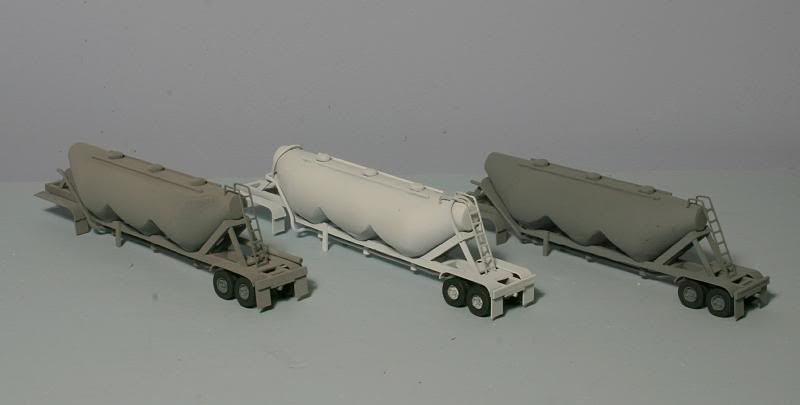
I built not just one, but three trailers for this project. Two of them I painted gray as shown above. I did the third one (center below) in white, and gave it a slightly more modern appearance by adding loop braces over the tank ends.
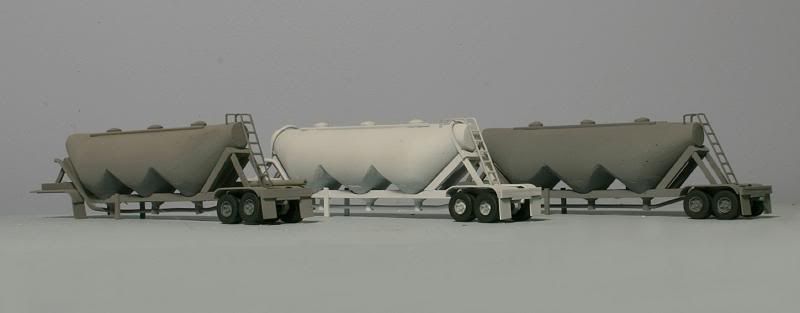
ůand thatĺs about all Iĺve got to show for now. Soon they will be parked at my concrete distribution facility, when I can get the scenery done.